

Twitter Mobile
Introduction
Mobile reproduction of the Twitter Sentiment Analysis project.
Core idea is the same but I wanted a way to make more widely available as opening up a jupyter notebook to run a python script which takes a single input keyword is a lot of work for not a lot of return.
App Architecture
There are multiple design paradigm’s typically employed in an Android application. Model-View-ViewModel is a very popular one. The 3 main players here are obvious but let’s talk a little about their interactions with one another. MVVM does a great job, in my opinion, of abstracting the View’s behavior.
MVVM
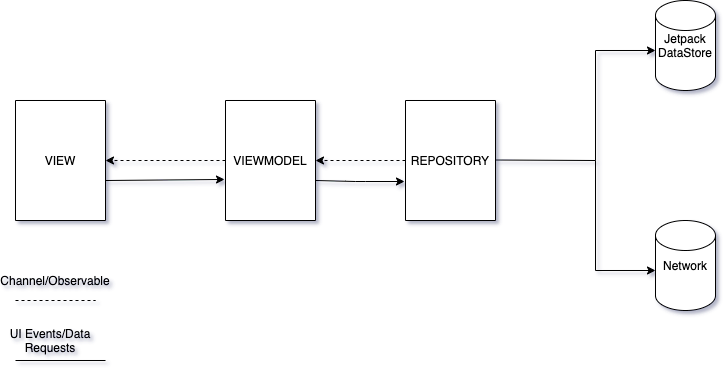
The ViewModel may provide a stream of events to which the View may subscribe to and take some action. It retrieves data from the Model layer, applies logic and exposes what it needs for the View. These exposures are happening via Channels, essentially Observables for Kotlin Corroutines.
The Model is there to easily expose consumable data, either retrieved from some local data source(Room DB, Jetpack DataStore, Shared Preferences, etc..) or from a remote web service.
The View may notify the viewmodel of some actions the user takes, this is 2 way data binding between view and viewmodel and results in the view keeping a reference to the viewmodel but the viewmodel having no information of the view. The viewmodel is the producer of data here and the view the consumer, consumer needs to know where the data is coming from but the producer does not care about who consumes the data down the line. \n
This is the actual interface of the app. Typically, A Fragment, Activity, or any other custom android View. Normally we have to take care to bind/unbind from the event streams in the appropriate lifecycle events, but as you’ll see later on. Kotlin Corroutines and Lifecycle aware components will take care of that for us.
Application Flow
Jetpack Compose
I decided to build this app using Android’s new Jetpack Compose Library(Still in Alpha). Compose is the modern toolkit for building native UI. Google describes it’s advantages in these 4 points
- Less Code
- Intuituve
- Accelerated Development
- Powerful
Being fully declarative, we are able to build the UI by calling as series of functions that turn data into a UI hierarchy, compared to methods of the past in which we needed separte view files described in .xml which we then referenced in our logic.
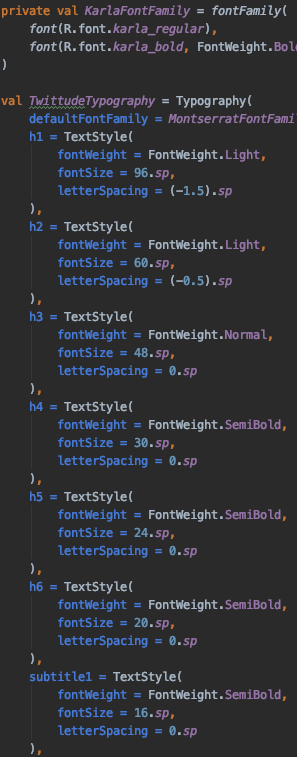
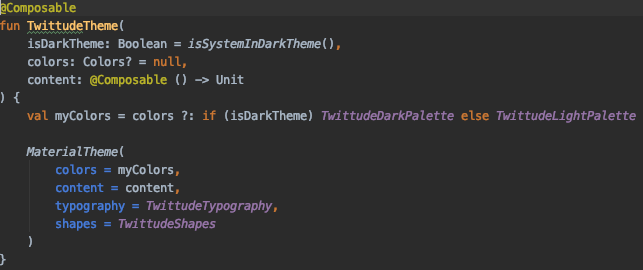
Jetpack Compose Theming
Compose makes it easy to have consistent look and feels to your app by applying themes. Material Theme is comprised of 3 attributes
- Color
- Typography
- Shape
By customizing these attributes, changes are automatically reflected in the composable components.
Starting with a themes package, we can create classes to create and store these attributes.

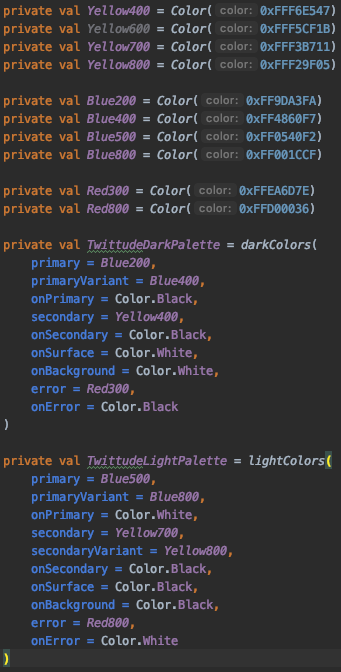
Color
Starting by defining the colors that will best represent the product.
Creating a Color Palette and utilizing Material.Colors.darkColors() and Material.Colors.lightColors(), we can create a complete color sets for the color specification.
Keep in mind this is all specified in our Theme class, making support for dark theme easier as seen in our Theme composable.
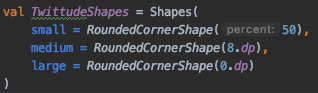
Shape
Shapes are pretty simple with Jetpack Compose, they are catagorized into 3 categories.
- Small components
- Medium components
- Large components
Each category allows for specifying a CornerBasedShape, which takes a parameter for sizing corners.
Typography
By defining a custom type system, you can continue to create a feel and look that best represents your product. Starting with defining a fontFamily containing a list of custom font files(.ttf), which are store in your res/font directory; you can take control of regular/bold/semi-bold/etc.. fonts giving you complete control.
Creating a Typography class, you can set defaults for each style…
Theme
This is all wrapped up into our Theme. Defined at the highest level of our UI hierarchy.
Building Views
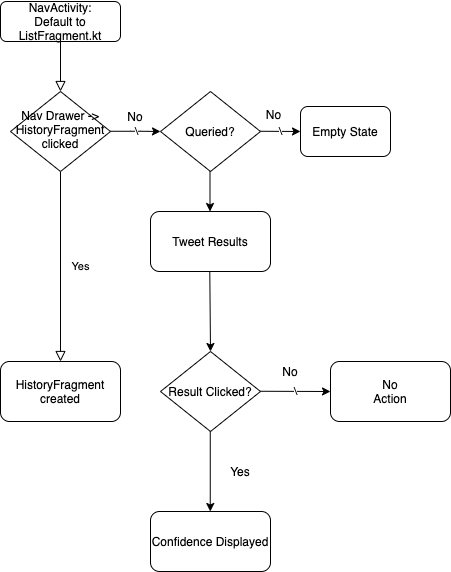
Now that we’ve got the MaterialTheme set, let’s talk about how the app will flow. Simple and easy to use, that’s my main focus. I’ve decided the entire app will consist of 2 screens.
- Search Screen
- History Screen
The app is hosted by a single Activity[NavActivity.kt], which hosts a NavigationDrawer in which we will link to our 2 screens(Fragments).
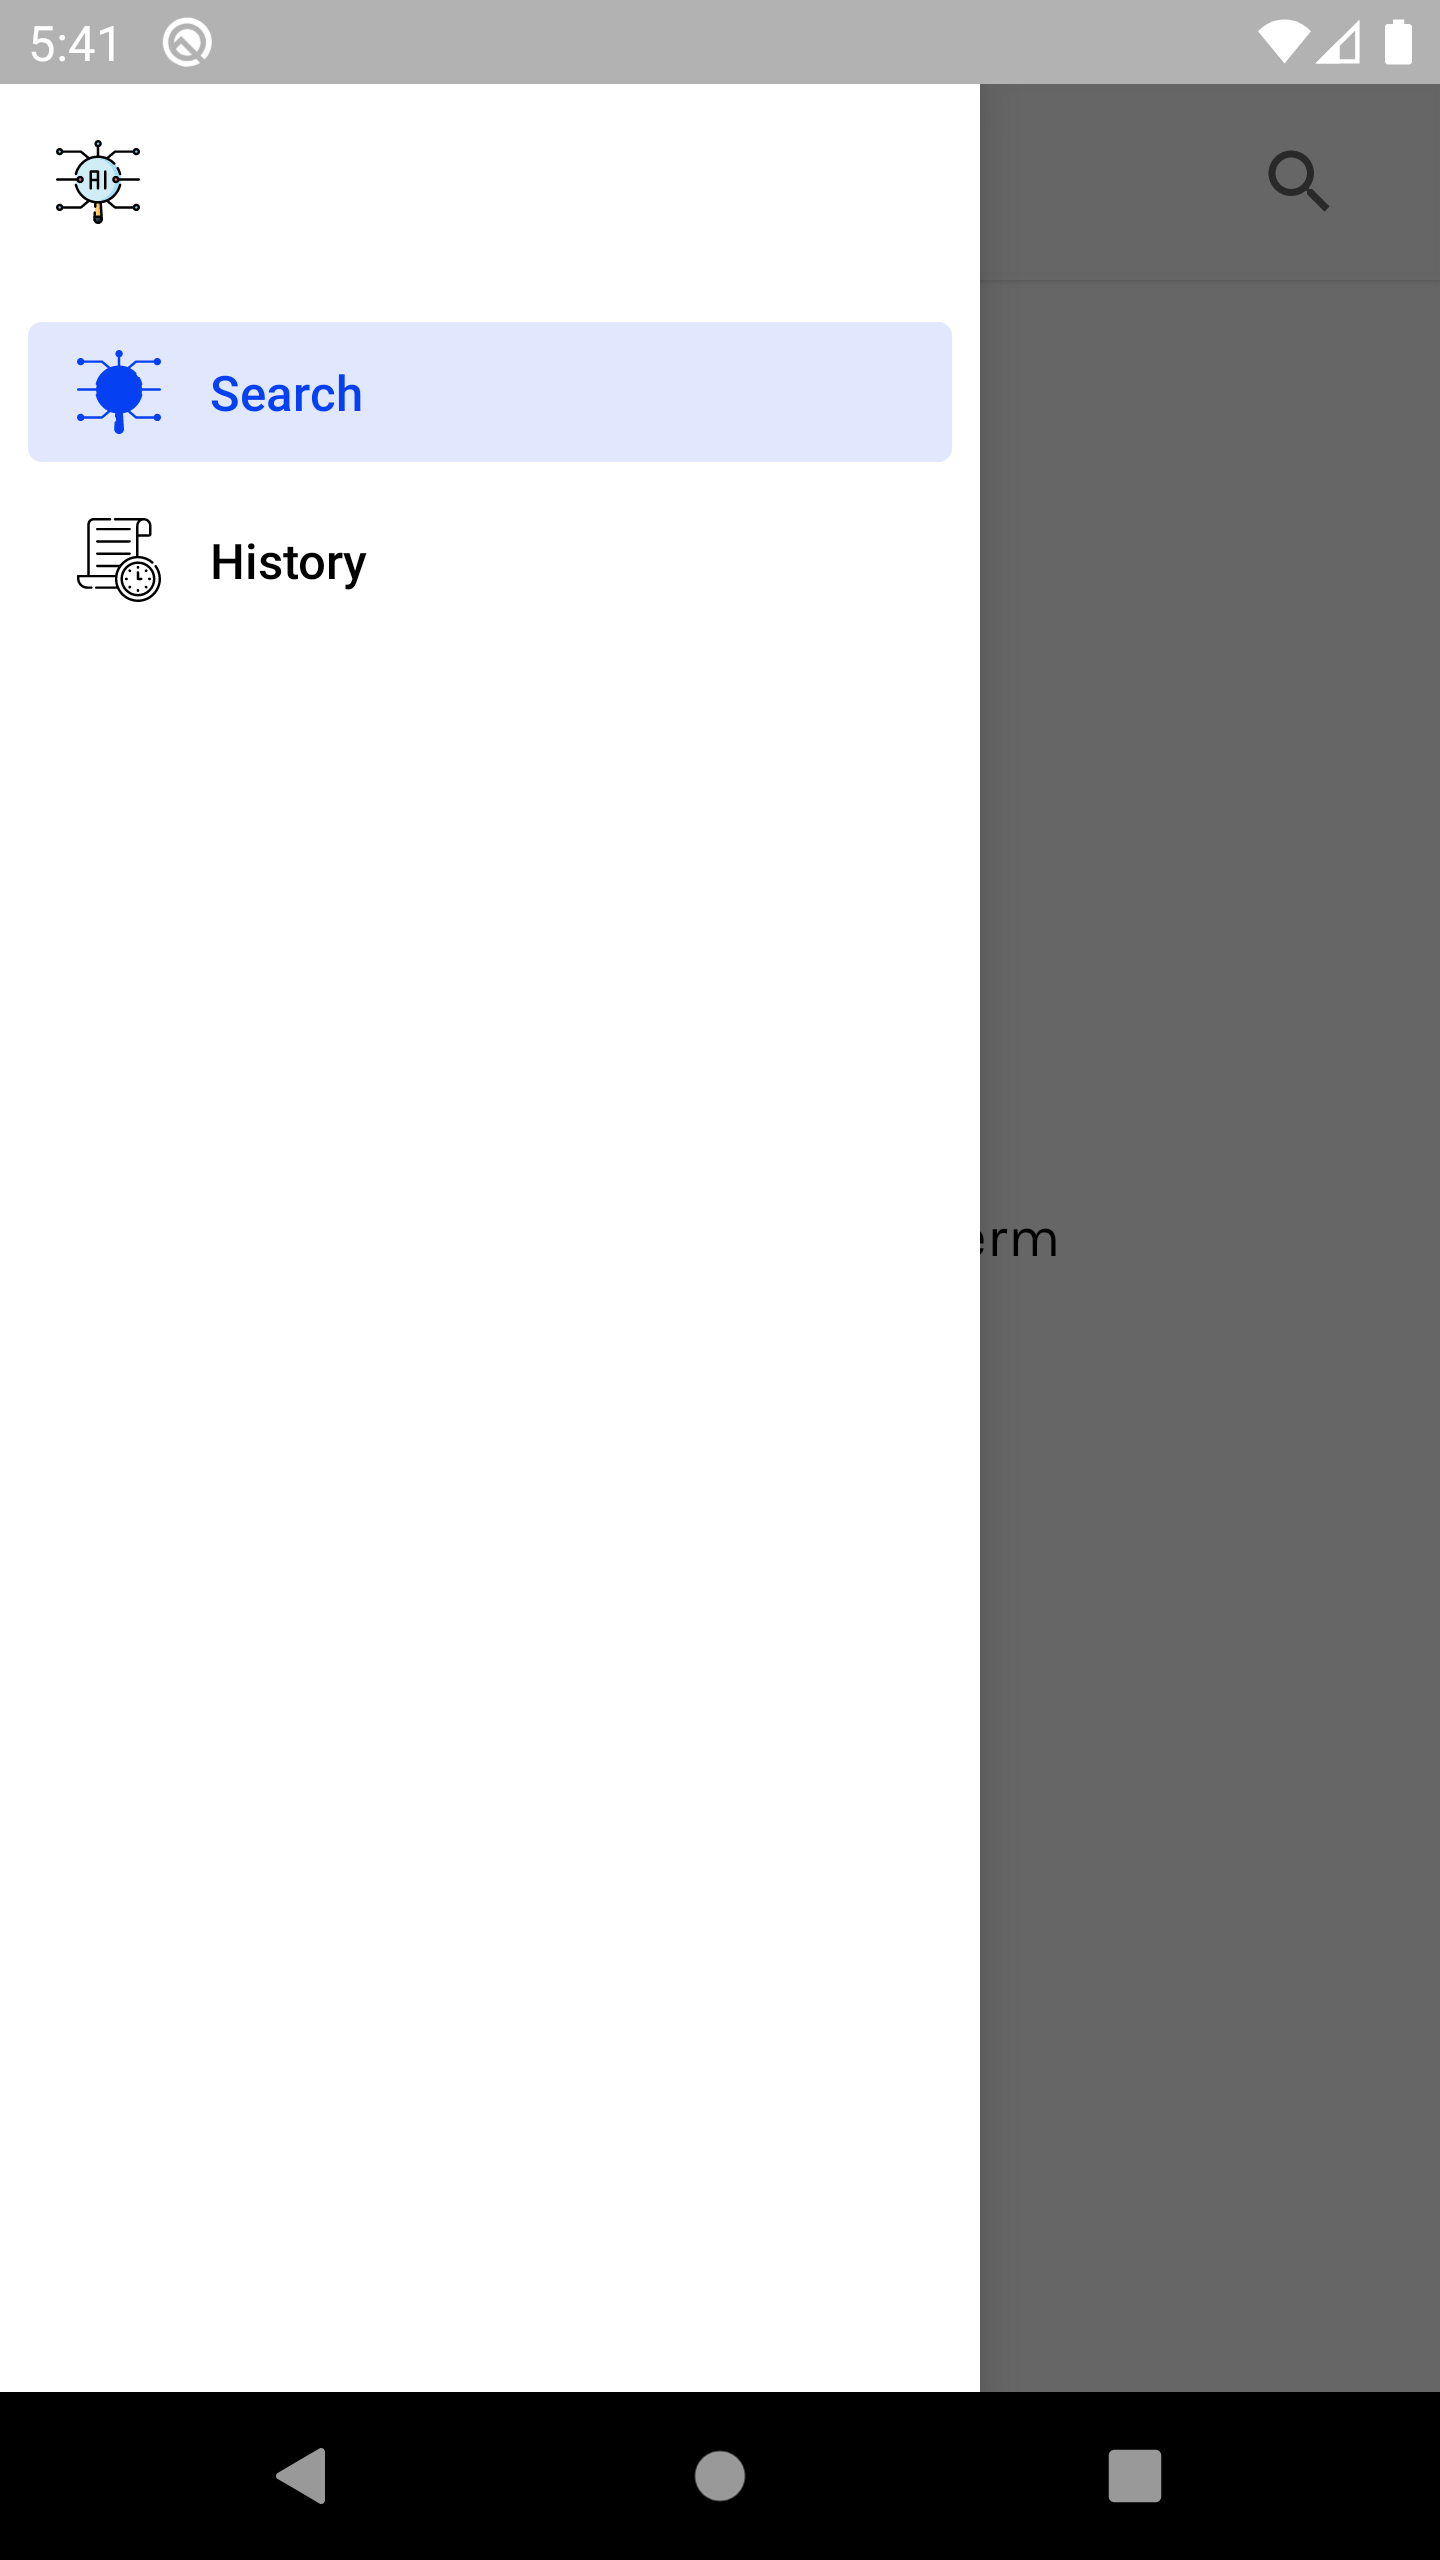
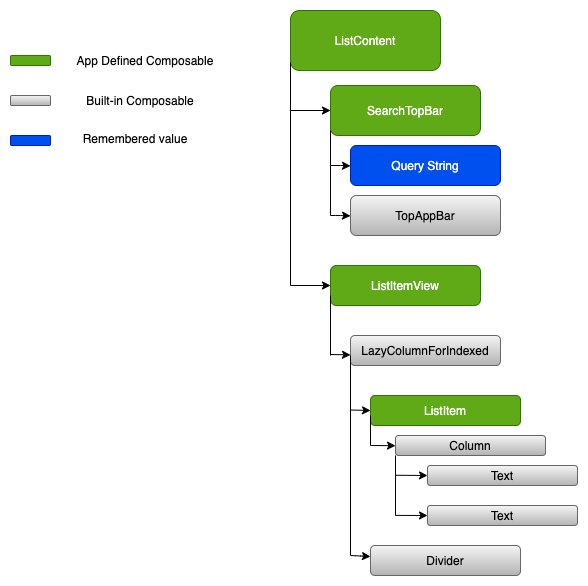
Search Screen (ListFragment.kt)
Let’s take a look at how we want to establish the view component hierarchy on this page.
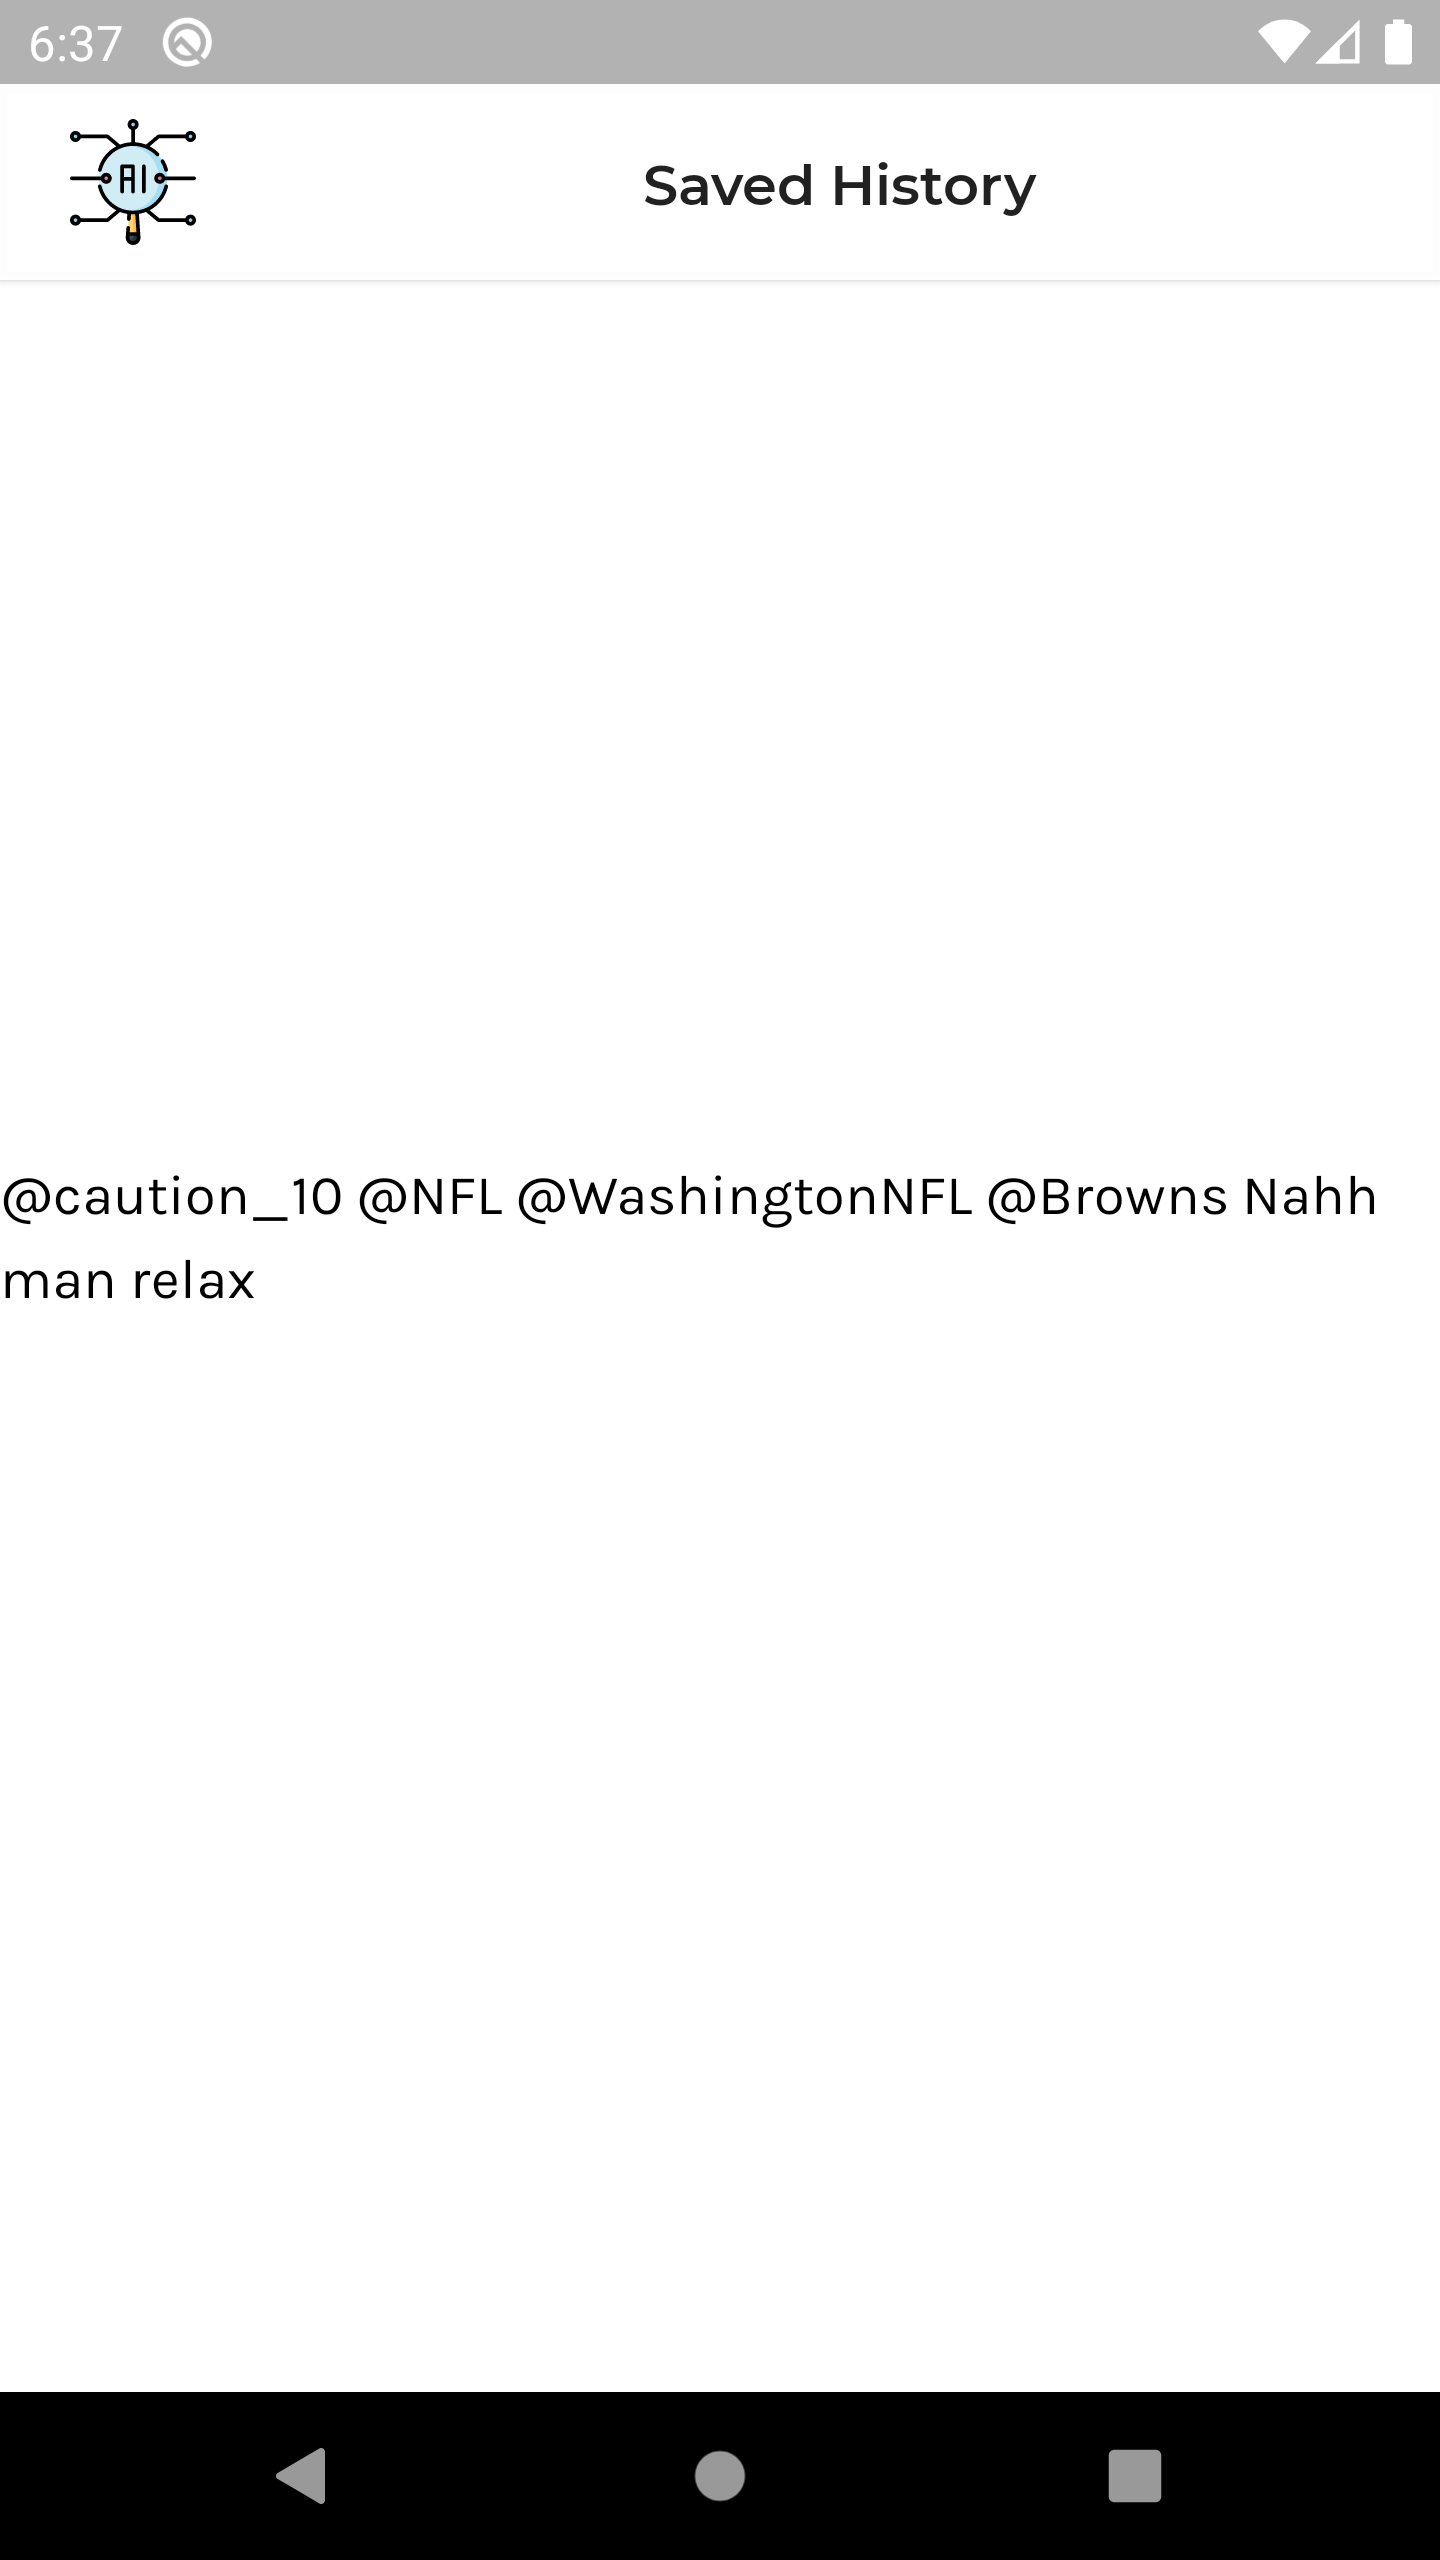
History Screen (HistoryFragment.kt)
Let’s take a look at how we want to establish the view component hierarchy on this page.
Fetching Tweets
Modeling out the API call
At first I was using the library Twitter4J to expedite making the API calls, so I could see some demonstratable results, I’ve since decided to model out the search response myself. Mainly to make testing my ViewModel/Repository logic more straight forward.
At the moment, this application will only make use of 2 API requests. One to authenticate and gain access to the twitter api and the other to make search requests which return the tweets we will pass through our model for sentiment analysis.
Authentication with Twitter API
The most important thing to point out here is that we are preforming what is called Application-Only Authentication, typically with OAuth1.0 we would be making requests on behalf of a user and need to sign each API request with serveral generated keys and tokens in an authorized header. This signature being passed to each request would represent that specific user.
With Application-Only Authentication and OAuth2.0 Bearer Token, which is used here, we are able to create a signature for the application itself. Typically used for instances that need read-only access to public information. This obviously limits the functionality of some endpoints for us since there is no concept of a “current user”, for example, a twitter user will not be able to use this application to take actions pertaining to their twitter account such as posting tweets or making profile changes.
Before being able to authenticate, there are a few prerequisites which can only be achieved by creating a developer account with twitter and receiving these items
- CONSUMER_KEY
- CONSUMER_SECRET
- ACCESS_KEY
- ACCESS_SECRET
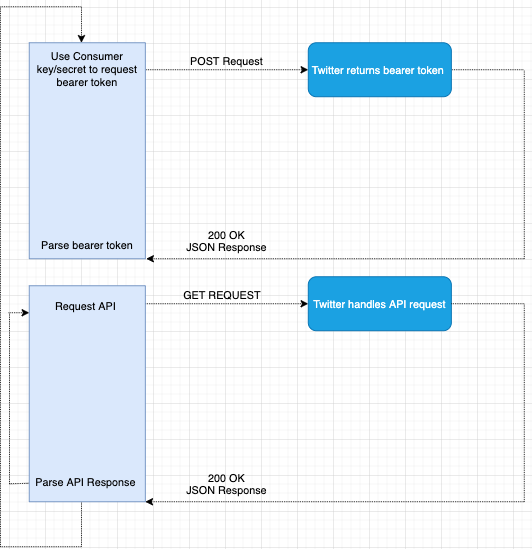
The graph above describes the entire application network flow. Focusing on the Top part, there are a few steps required in order to properly format our request and receive the bearer token.
1.) URL Encode(RFC 1739) both the CONSUMER_KEY and CONSUMER_SECRET 2.) Create a new string in format of “CONSUMER_KEY:CONSUMER_SECRET”, using the encoded versions created above. 3.) Base64 encoded the string created in the step above.
We can now make the post request to the resource url https://api.twitter.com/oauth2/token, there are some required headers and query params. The request should look something like this
POST oaut2/token
Authorization: Basic <Base64 encoded concatenated string from above>
Content-Type: application/x-www-form-urlencoded;chartset=UTF-8
grant_type=client_credentials
If everything was properly formatted then we received the bearer token in a json response.
{
  "token_type": "bearer",
  "access_token": "AAAABBBBCCCCDDDEEEFFF%AAAABBBBCCCCDDDEEEFFF"
}
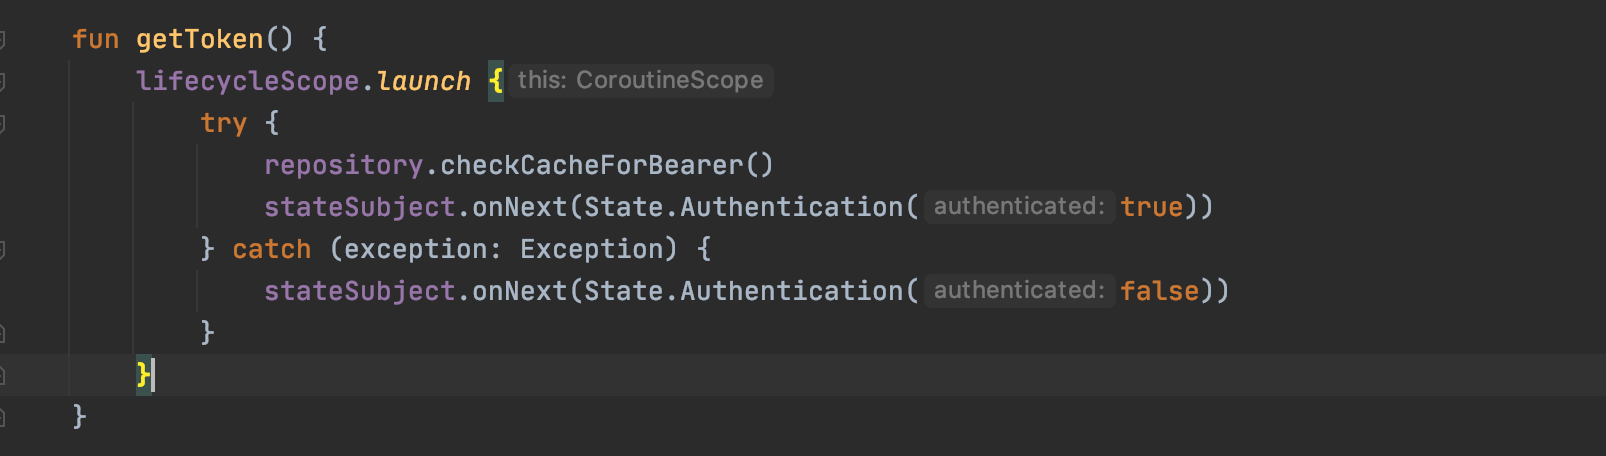
That’s it. Something to remember here is to cache this bearer token, making this request over and over will return the same bearer token until it is invalidated, which would usually be done in the case of it being compromised. Making the request for the bearer token can be expensive and use up our precious rate limits, we should not make network requests against the api unless necessary. I’ve chosen to store this token using DataStore which is on the device. Although there are many options to choose from.
Making a twitter Search API request.
Now that we’ve authenticated our app and cached our token, we are able to make requests against all the available API endpoints. This is the bottom half of the graph shown above, top half was authentication and bottom is using that token to validate our requests.
The main Twitter API method used in this app is /search. For now, all we are interested in is searching a keyword and receiving a certain number of tweets that have been designated to have our search term as the core topic.
Standard Search API
As of this writing, I updated my developer account to use the early access V2 Api’s. These are supposed to be much more developer friendly and from viewing the JSON responses, I would agree that they are. V2 Search API
The only required parameter is obviously, the query itself. This is an example of a potential search request
GET /2/tweets/search/recent
Authorization: Bearer <Bearer Token here>

query="atlanta falcons"
lang="en"
max_results="100"
This request will return 100 tweets around the Atlanta Falcons in english only.
And that’s it. Pretty simple. Now time to write to code for making these network requests.
Calling the API in code
The challenge here was that before now, I have only used RxJava for my asynchronous streams. I decided to give Kotlin Corroutines a try. Since I’m already using Android ViewModel, an android Architecture component, which provides 1st class support for corroutines due to the built in Coroutine scopes, I figured it would be a good time to get my hands dirty. The biggest hurdle was just understanding the differences (conceptual and syntatic) between RxJava world and Corroutine world.
All Coroutines are started from a CoroutineScope, which depend on our life-cycle aware component scope.launch{} is just an extension function of the ViewModelScope because it implements interface CoroutineScope. By default, the code inside the launch{} block is run off the main thread(Dispatchers.Main), this allows a simple, straight forward way to run non-blocking code.
3 Dispatchers: Tells coroutine which type of threads to use for execution of corrotine block.
- Dispatchers.Main
- Handle operations needing to run on the main thread, mainly UI. If these types of operations are NOT run on Dispatchers.Main, we crash.
- Dispatchers.IO
- Handle input/output, network operations. API Calls, reading/writing to disk and any DB communications
- Dispatchers.Default
- Called when no dispatcher is specified, typically used in CPU intense cases such as sorting list, parsing json and other similar tasks.
Authenticating in Code
Let’s take for example Authentication.
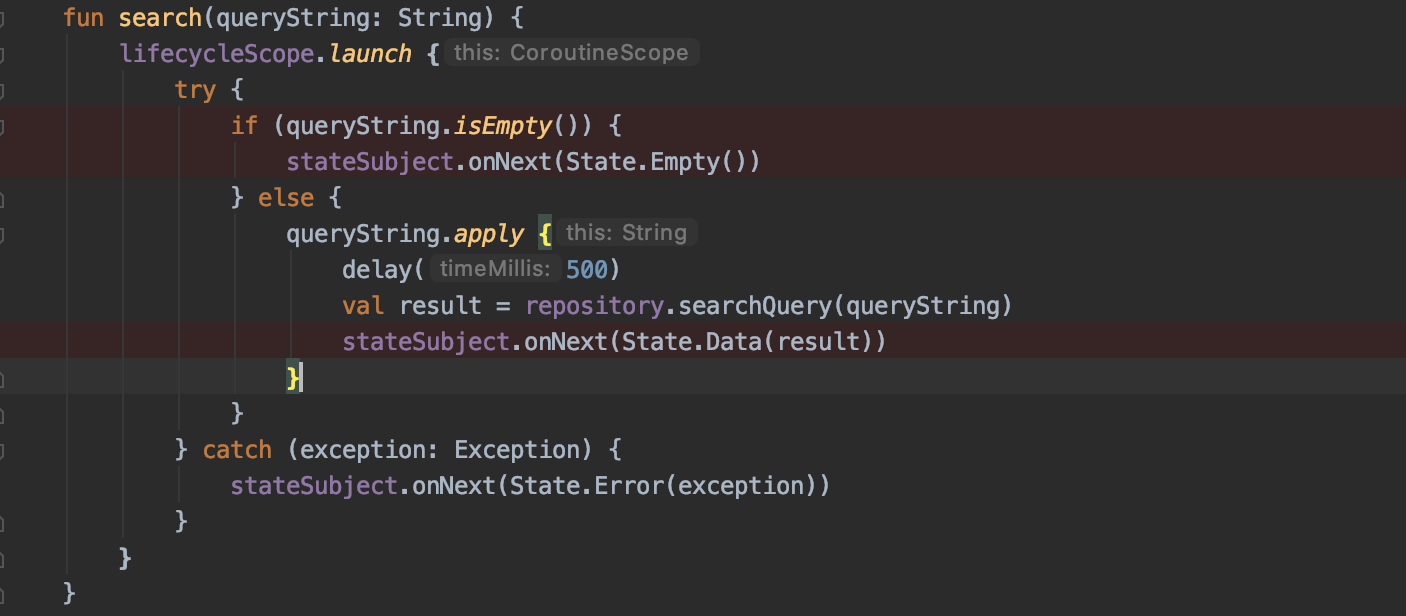
Searching in Code
In our viewmodel’s search function. We are preforming an asynchronous call to the network. These calls typically take less than a second but in the case of a slow network response, we are not blocking the UI, allowing the user to make any desired navigation.
That’s enough about the ViewModel. The repository layer is where the network magic happens.
Storing results with Jetpack DataStore
Jetpack DataStore allows storage of key-value pairs, it uses Kotlin coroutines and Flow for asynchronous data storage. This should be considered as a replace to SharedPreferences.
2 implementations are provided:
- Preferences DataStore: Key-value pairs
- Proto DataStore: custom data types, requires a defined schema using protocol buffers
Start with declaring the dependencies, since we are not storing typed ojects, we don’t need the Protocol buffers dependency
dependencies {
  // Preferences DataStore
  implementation "androidx.datastore:datastore-preferences:1.0.0-alpha01"
}
I’m running into an issue of saving to disk and reading from disk across my 2 fragments. So I’ll document my debugging process here. First step I’d take is to successfully read and write in the simplest case. I will keep a counter of how many times the list fragment has been instantiated and persist that number to disk.
Upon launching app and creating the List Fragment, we call the viewModel function.
ViewModel Layer
fun launchCounter() {
    lifecycleScope.launch {
        repository.incrementCounter()
    }
}
This calls to the repository which writes the data to disk.
Repository Layer
override suspend fun incrementCounter() {
    val dataStore: DataStore<Preferences> =
        GlobalContext.get().koin.get(qualifier = named("counter"))
    val EXAMPLE_COUNTER = preferencesKey<Int>("example_counter")
    dataStore.edit { settings ->
        val counterValue = settings[EXAMPLE_COUNTER] ?: 0
        settings[EXAMPLE_COUNTER] = counterValue + 1
        Timber.d("SAVED!%s", counterValue)
    }
}
After launching the app multiple times and logging the value, it is indeed working. Let’s try to again apply this to saving a tweet from the list fragment and reading from the history fragment, which is where the tweets saved to disk should ultimately be displayed.
Since I’m retreiving the DataStore via dependency injection and now I’ll have 2 instances(1 for counter, 1 for tweets), I need to add named qualifiers for these in my Koin module.
single<DataStore<Preferences>>(
    qualifier = named(name = "counter")
) {
    androidContext().createDataStore(
        name = "settings"
    )
}

single<DataStore<Preferences>>(
    qualifier = named(name = "tweets")
) {
    androidContext().createDataStore(
        name = "tweets"
    )
}
Now when we make our call to the search request and have a list of tweets, for now just clicking the tweet will save the contents to our DataStore Preferences declared in the DI module
Making the call to the view model from the list item click listener
@Composable
fun ListItem(item: TwitListItem, viewModel: TwitMainViewModel) {
    Row(
        modifier = Modifier
            .fillMaxWidth()
            .clickable(onClick = {
                viewModel.saveTweetToDisk(item)
            })
    ) {
        Text(text = item.text)
    }
}
In the ViewModel
fun saveTweetToDisk(tweet: TwitListItem) {
    lifecycleScope.launch(Dispatchers.IO) {
        repository.saveTweetToDisk(tweet = tweet.text)
    }
}
and in the repository layer
override suspend fun saveTweetToDisk(tweet: String) {
    val TWEET_KEY = preferencesKey<String>("tweet_key")
    dataStore.edit { tweetPreferences ->
        tweetPreferences[TWEET_KEY] = tweet
        Timber.d("SAVED!%s", tweet)
    }
}
- Remember that
suspendfunctions require a calling context, this means that you can only call suspend functions inside of another suspend function. Same with@Composablefunctions, this is new to me and has cause quite a bit of issues getting this app due to typical paradigms no longer being applicable.
As for fetching the tweet we persisted to disk…
We make the call to the HistoryViewModel as soon as we start to construct the views.
ViewModel Layer
fun readTweetFromDisk() {
    lifecycleScope.launch {
        repository.readTweetFromDisk()
            .flowOn(Dispatchers.IO)
            .collect {
                stateSubject.onNext(
                    State.Data(listOf(it))
                )
            }
    }
}
Repository Layer
override suspend fun readTweetFromDisk(): Flow<String> {
    val TWEET_KEY = preferencesKey<String>("tweet_key")
    Timber.d("Is it here?: %s", dataStore.data.first().contains(TWEET_KEY))
    return dataStore.data.map {
        it[TWEET_KEY] ?: ""
    }
}
Notice that the function declaration does not contain suspend. This is because the lifecycleScope of the viewmodel is suspending.
We subscribe to the Flow<T> being return from the repository and declare the thread we want the subscription on, next we collect the value and pass it through the state back to the view. and wah lah!
Important Note:
Normally you wouldn’t use a key/value store in this manner. SharedPreferences/DataStore makes storing and reading small amounts of data fast and easy but difficult to store and read large structured data. Since this write-up is taking on new/experimental libraries, I didn’t want to divert on this part either.
Typically I would use a library backed by SQL, like Room. This makes large amounts of structured data easy to read/write, as the data is structured and managed by the database. This would allow potentially a huge list of tweets to be displayed and saved on the History screen. One would likely create a custom object such as
data class TweetDiskObject(
  val tweet: String,
  val date: String
  )
Allowing for more complicated data objects to be persisted and retrieved, creating more opportunities to manipulate and display what the user wanted saved.
Using Tensorflow Lite pre-trained model
Now to get back to the original inspiration for this quick project(quick for most, not me).
WIP!!!
UI and Unit Testing with Compose
A big difference with compose is that, since we are now just invoking functions, we do not have a reference to our widgets and there is no concept of ID, therefore we can not perform something like findViewById<TextView>(R.id.some_view).
Jetpack compose introduces `Semantics, providing information about the view hierarchy. It gives meaning to a piece of UI. Tests take advantage of the information exposed by semantics regarding the UI hierarchy.
With Unit Testing, nothing as changed. Since we are concerned with the data and ensuring our functions do what they are supposed to.